AutoCAD Tips and Tricks - Layers1. Layer Filters for a Quick Layer Managment
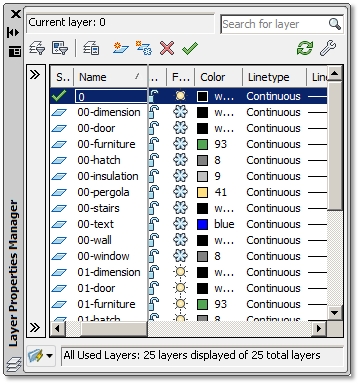
Whenever you have a lot of layers in your drawings, it will probably take you longer to locate the one you need. If they belong to some groups, e.g. different floor plans in your drawing, it will make sense to group (filter) them in Layer Properties Manager as well. You will be able to manage your layers more quickly. Group Filters can be created manually, by grouping the layers you want, or automatically, by grouping layers according to their properties (Layer Property Filter).
Create a New Group Filter
1. Ribbon / Home tab / Layers panel / Layer Properties Manager
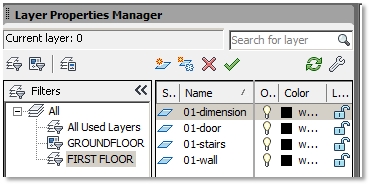
2. If you don’t see the Filters options, click on the top left arrow to expand the layer filter tree. 3. Filters options / Layer Group Filter icon / Type the name of a new group filter. 4. Filters options / All / View all layers in your drawing. 5. Drag´n´drop layers from the layers list onto the name of a new group filter. 6. Click on the name of a group filter to list only layers in this group. 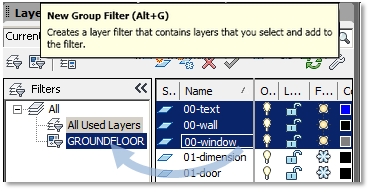
Create a Layer Property Filter
1. Filters options / New Property Filter icon / Layer Filter Properties dialog box.
2. Filters name / Type the name of a property filter. 3. Filter definition / Select Property filters, e.g. click the Name cell and type and type layer name prefix (e.g. *01*). Also click color cell and select color filter (e.g., black). You can click Show example button to see property filter examples Ok. 4. Click on the name of a property filter to list layers with pre-defined properties, e.g. layer that include 01 in their name and are black color. 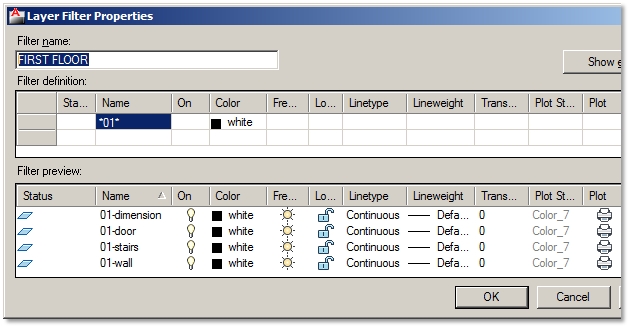
2. Quick Display of Layer States
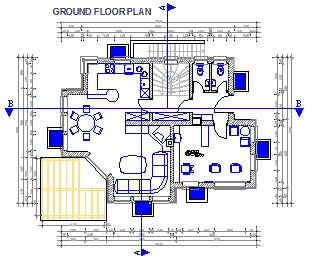
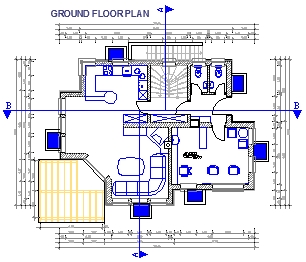
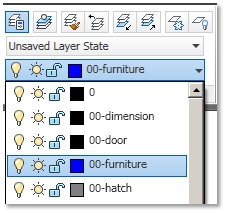
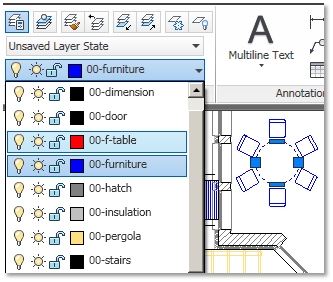
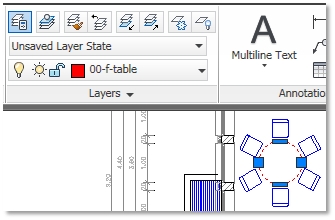
If group and property filters help you to find or change properties of layer groups in the Layer Properties Manager, Layer States actually display and restore the right layer information in your drawing. For example, to quickly toggle between ground and upper floor plans.
Create a Layer State
1. Ribbon / Home tab / Layers panel / Layer Properties Manager
2. Turn off/on layers to display, e.g. ground floor plan. 3. Layer States Manager icon / Layer States Manager dialog box 4. New button / Type new layer state name, e.g. Ground floor plan. 5. Close Layer States Manager dialog box. 6. Repeat the procedure to save another layer state, e.g. First floor plan. Activate a Layer State
1. Ribbon / Home tab / Layers panel / Layer Properties Manager Layer / States Manager icon.
2. Click the name of layer state / Restore button. 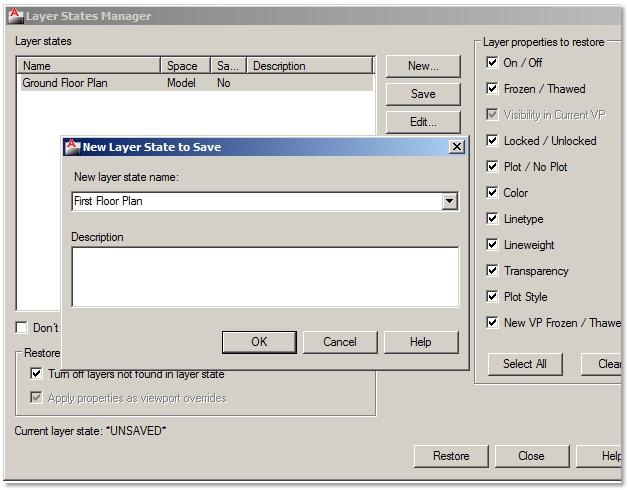
Extra tip: In Layer States Manager dialog box you can choose which layer properties to restore. For example, if color is turned on, then all changes you have made after saving layer state will be ignored when restoring layer state. Edit button allows you to add/remove layers to saved layer state and change their properties.
3. Control the Display and Order of Layer Columns
You can control the order and display of layer columns to save time without moving the layer slider at the bottom of Layer Properties Manager palette.
Re-order Layer Columns
1. Ribbon / Home tab / Layers panel / Layer Properties Manager
2. Drag´n´drop layer column to another position. Fix Layer Columns
You can also fix or freeze layer columns so that they remain seen when you move layer slider to browse through other layer columns.
1. Shortcut menu on the name of layer column to fix / Freeze column 2. All columns to the left of the clicked column will be frozen.
Display Layer Columns
1. Ribbon / Home tab / Layers panel / Layer Properties Manager
2. Shortcut menu on the name of any layer column / Select columns you want to display. Restore Layer Columns
After you´ve messed with layer columns you might find out that it wasn’t such a good idea. You can easily restore layer columns to default settings.
1. Ribbon / Home tab / Layers panel / Layer Properties Manager 2. Shortcut menu on the name of any layer column / Restore all columns to defaults. 4. Override Layer Properties in Viewports
Layer properties overrides can be very useful when trying to plot the same geometry with different layer properties. You don’t have to duplicate geometry and assign it new ByLayer properties. Just display it in various layout viewports and assign each one its viewport override properties.
Assign Layer Properties Override

Remove Layer Properties Override
You can recognize layers with overridden properties in the layer list as they are indicated by a light blue background color when viewport is activated. Overrides can be removed at any time.
1. On the layout tab double-click the viewport to activate it. 2. Shortcut menu on the overridden property / Remove viewport overrides for / Color / In the active viewport only (other options are also available). 
5. Freeze or Isolate the Layer of Selected Object
Especially in large drawings freezing unneeded layers can be very slow. You can speed this up by simply selecting one object and all others that belong to the same layer as the selected one will freeze as well. You can do the same to quickly isolate objects.
Freeze Layer of Selected Object
1. Ribbon / Home tab / Layers panel / Freeze or type LAYFRZ.
2. Select an object on the layer to be frozen.
Isolate Layer of Selected Object
1. Ribbon / Home tab / Layers panel / Isolate or type LAYISO.
2. Select an object on the layer to be isolated.
To restore all layers that were hidden with the Isolate command.
1. Ribbon / Home tab / Layers panel / Unisolate or type LAYUNISO 6. Save Time and Control the Display of Objects without Changing Layer Properties
Hide Objects
1. Select objects.
2. Shortcut menu on your drawing area / Isolate / Hide Objects
Isolate Objects
1. Select objects.
2. Shortcut menu on your drawing area / Isolate / Isolate Objects 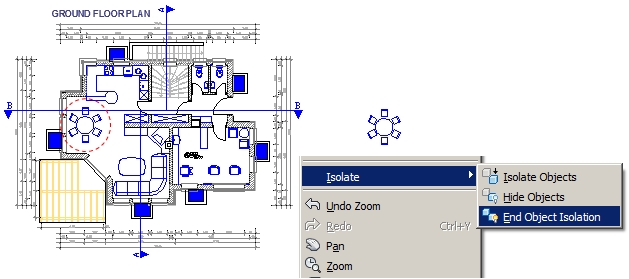
End Object Isolation
To display all hidden and isolated objects:
1. Shortcut menu on your drawing area / Isolate / End objects isolation Extra tip: You can also hide and isolate selected objects by right-clicking a light bulb on the right side of status bar. If the light bulb is turned off, it indicates that some objects are hidden. 7. Assign Properties to Layer on the Ribbon Panel
You can assign most of the layer properties directly on the ribbon without the need to open Layer Properties Manager. By doing this you can save some time and drawing area space.
1. Ribbon / Home tab / Layers panel / Layer drop-down list Make a Layer Current
Freeze/Turn On/Lock a Layer
Change Layer Color
Transfer Objects to Other Layers
Quick Check of Object Layer Property
8. Assign ByLayer Property to All Objects at Once
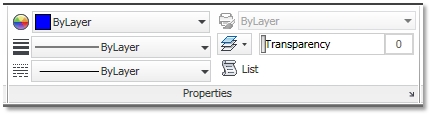
It is best practice to control as many object’s properties as you can through layer settings. That way you don’t have to waste time selecting objects you want to change properties to. You just change layer settings and all objects that belong to this layer will be updated. However, not everybody is well organized and instead applies properties to objects directly. This might not be such a problem, if drawings aren’t big and you don’t have to modify them a lot. But, in worst scenario it might be easier to set all object properties ByLayer and simply change layer properties.
1. Ribbon / Home tab / Modify drop-down panel / Set to ByLayer 2. Specify the Settings [S] option to open SetByLayer Settings dialog box. 3. Select properties to change by layer (Color, Linetype, Lineweight, Material, Plot Style, Transparency) 4. Select objects to set by layer. 5. Choose Yes or No to change ByBlock to ByLayer. 6. Choose Yes or No to include blocks. 
9. Display Objects on Layers that You Select in the Layer List
In large drawings it is sometimes quite a job to display the right layers on the screen or just check all objects that belong to a single layer. Layer Walk command can help you out.
1. Ribbon / Home tab / drop-down Layers panel / Layer Walk LayerWalk dialog box options: - Click on layer’s name to display objects on that layer. - Select objects button to display objects on the layer of selected object. - Hold Ctrl to add click layers to select many layers. - Double click to (un)preserve the display of a layer when selecting other layers. - Check Restore on exit to preserve displayed layers after closing the dialog box and vise-versa. - Purge button purges unreferenced layers. 
|
Additional AutoCAD Tricks
|

|
|