AutoCAD Tips and Tricks - Layout and Plotting1. Predefined Plot Settings
Selecting the right plotter, paper size, plot style table, etc. each time you plot with the same settings can be a drag. If you really use the same plot settings very often, you can save them as a Page Setup. You can even save many different Page Setups separately for plotting in Model or Paper space. Before plotting just choose a current Page setup and most if not all plot settings are already defined.
1. Right-click on Model or Layout tab / choose Page Setup Manager from the shortcut menu 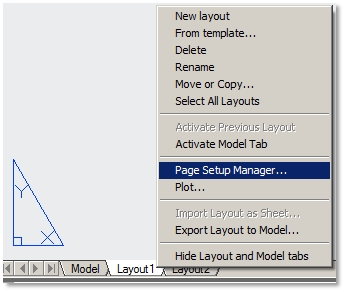
2. Page Setup Manager dialog box / Click New button
3. Type new page setup name. 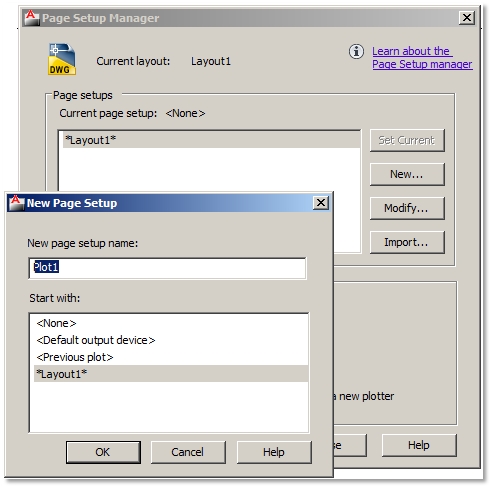
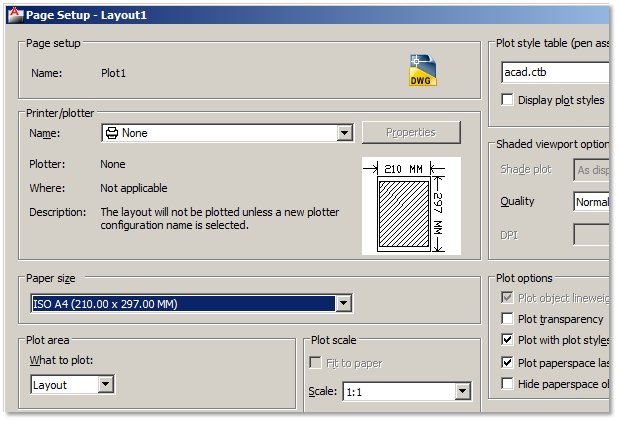
4. Page Setup dialog box / Choose your plotting settings / Ok
5. Activate Page Setup / Select page setup from the Page Setups list / Click Set Current button.
6. Modify Page Setup / Select page setup from the Page Setups list / Click Modify button. Extra tip: Save your Page Setups in your drawing template and your plot settings will be ready every time you start a new project. 2. Convert .DWG to Raster Image
You can convert your .DWG drawing to raster image in different ways.
Save Displayed Geometry as a Raster Image
Plot to Raster Image
1. Choose Plot command.
2. Printer/Plotter options / Choose Publish to Web JPG.pc3 plotter type to save as .JPG raster image. 3. Paper Size / Choose resolution of the raster image. 4. Plot Area / Use Window to specify content of the raster image in your drawing. 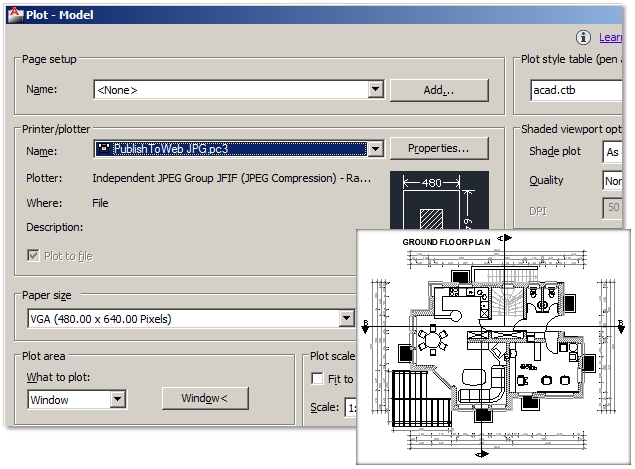
5. Select other plot options / Ok
6. Specify raster image file path and name / Save Raster image doesn’t include the display color background or grid lines. You can choose Publish to Web PNG.pc3 plotter to save a .PNG raster image file. 3. Plot a Mirrored drawing of Your 2D Drawing
The quickest way to plot a mirrored image of your 2D drawing is to activate Bottom 3D view.
1. Ribbon / View tab / Views panel / Views / Bottom 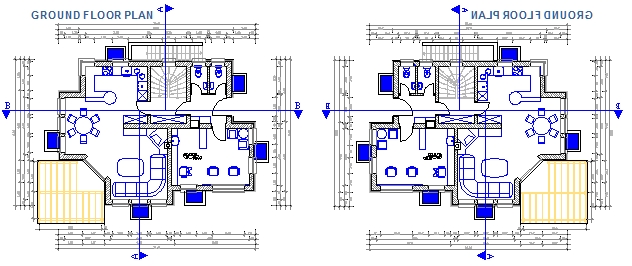
4. Automatic Adjustment of Annotation Objects Size When Changing Plot Scale
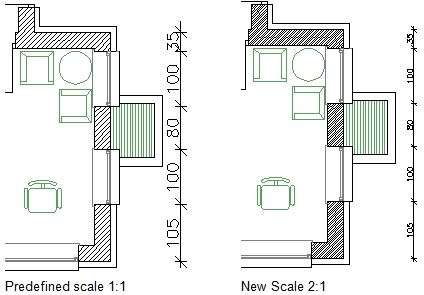
Normally you decide on your drawing plot scale at the beginning of your project. According to that you determine what hatch scale, text height or dimension style you will use during your work, so that your drawings will be readable and nicely designed when plotted. But more often than not you will probably have to plot your drawing in other scales than the one you´ve predicted. Using the same object scales, text or hatch might be too small to read or too big to look nicely. Changing scale settings is always time consuming because you´d probably also have to move some objects according to their new scale sizes. Well, all annotation objects have a property called Annotative. If you turn it on, this whole procedure will be done automatically whenever you change a plot scale. Simply follow the next procedure.
Prepare Plot Scale List
1. Format / Scale List
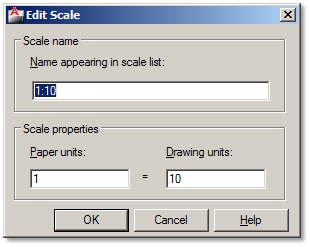
2. Edit Drawing Scales dialog box / Click Add button 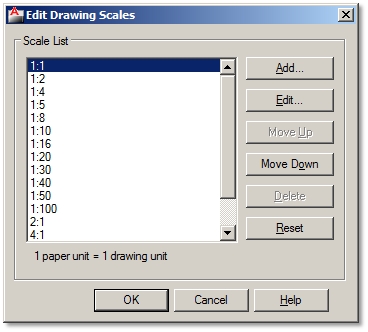
3. Specify Scale name and Scale properties (the ratio of plotted mm to drawing units).
Set the Annotation Scale of Your Drawing
1. Click the Annotation Scale menu on the right side of the status bar.
2. Select a scale of your plotted drawing from the list. 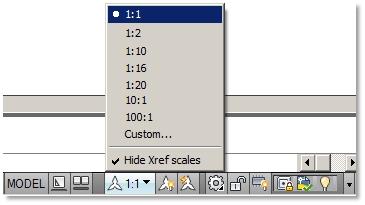
Assign Annotative Property to Your Annotation Objects
Create styles of annotation objects, e.g. text, dimensions, tables, etc. for the current annotation scale of your drawing, and set them the annotative property. For example, Dimension Style:
1. Ribbon / Home tab / Annotation drop-down panel / Dimension Style 2. Create or select a dimension style. 3. Fit tab / Select Annotative 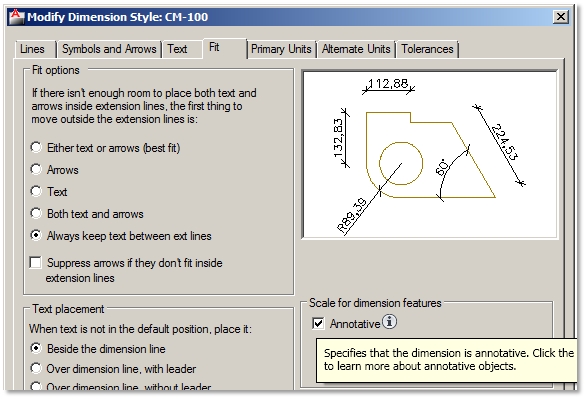
Insert Annotative Annotation Objects in Your Drawing
Insert annotative text or dimensions to your drawing. If you want to insert annotative hatch, you must select the Annotative property before creating it.
1. Ribbon / Home tab / Draw panel / Hatch 2. Contextual ribbon Hatch Creation tab / Options panel / Annotative 3. Also select the right hatch scale for the current annotation scale. 4. Select objects or pick points in areas to hatch. 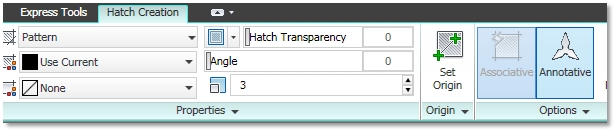
Automatic change of Annotative Objects Size When Selecting a Different Annotation Scale
1. Turn on icon Automatically add scales to annotative objects when the annotation scale changes on the right side of the status bar.

2. Annotation scale list / Select a different annotation scale.
Extra tip: When working with annotative objects you must be careful about the number of different scales on the Annotation scale list on the right side of the status bar. If your drawing starts to respond slowly or you may notice its strange behavior, check for too many scales in the Annotation scale list. Type –SCALELISTEDIT to reset scale list to default. All custom scales will be deleted.
|
Additional AutoCAD Tricks
|

|
|